Defining Your Own Containers
DIY Large Language Model (llm)
ml-toolkit is not just limited to the built in AI/ML models for atomic potentials. It can in principle be used for any software. So Lets try something a bit more interesting. We are going to create our own custom configuration for an llm based chatbot using Ollama. At first this may sound intimating, in practice however, this is surprisingly straightforward.
To start we need two things:
a container config (.yaml) file
a container definition
Writing a Container config (.yaml) file
We will start with the container config. Create a new file ollama.yaml in the Container_Configs directory and add the following text.
Note: the indentation (using 4 spaces at the start of every line after “Ollma_Test_container:”) is important.
# This is an Ollama Container config to test with
Ollama_Test_Container:
    description: 'latest version of ollama pulled from dockerhub, for testing'
    group: LLM
    container_definition:
This is all the information we need to define a simple container. There are many other options you can use for more advanced cases, which are documented in Config Options. However, these are the only 3 options that are strictly required.
If you are familiar with python programming you may have come across the .yaml format before. However put simply it’s a way of grouping related data together in a human readable hierarchy. In our case we are using it to define basic information about our containers in a way that ml-toolkit and Apptainer can understand.
Note: lines starting with a # symbol are known as comments. These lines are ignored by the computer and are intended as notes to anyone who is reading the file.
A brief aside:
You can define multiple containers in a single file by simply un-indenting the entry for the next container. A good example of this is in Container_configs/Test_containers.yaml which defines two different containers, used for testing. This can be useful if you have multiple related containers you wish to group together.
Returning to the config file, the first actual line “Ollama_Test_Container” is a human readable name we will use with the run command. This can be any combination of letters and numbers ending with a colon. However, it cannot contain spaces or special characters (except hyphens, underscores and/or periods). It should also ideally be short and vaguely descriptive.
As previously mentioned all lines beyond this point need to be indented. This tells ml-toolkit that they are information related to “Ollama_Test_Container”. They consist of a “field name” followed by a colon then the data related to that field.
Technically you can use be any number of spaces for the indentation (just not tabs) as long as you are consistent throughout the file. In this case I have used 4 spaces.
The first indented line is a brief description to tell other people (and sometimes yourself in 6 months time) more information about your container. Note: This is the text that is displayed when using the list command.
The second line defines a group. This is a simple text label to allow you to group similar containers together and filter them when using the list command.
The final line is for the container definition. This can either be the path to local a definition file (.def) or a link to an external container repository. Which is a special type of website that hosts pre-built containers for people to make use of.
For the moment the definition section has been intentionally left blank so lets get into what we need for this.
Container Definitions
Next we need a container definition. This is a blueprint that tells Apptainer how to create our container. For this we will create our own .def file that is based on a definition from an external container repository.
This is useful when dealing with software as complex as Ollama. As much of the hard work has already been done for us we just simply need to tweak it to suit our needs.
Apptainer can access several different container repositories, such as Container Library and ORAS.
However, for this we will use dockerhub which is the public container repository which is commonly used for a different container software called docker.
This is by far and away the most popular container repository with official definitions for building containers to work with a huge amount of popular software. Including Ollama.
To use the definition from dockerhub with our container we will need to find the apropriate link to dockerhub.
Links to dockerhub come in two parts a repo name and a version tag and have the form:
docker pull {REPO_NAME}:{TAG}
In our case we don’t need the docker pull section just the repo name and tag. So to find the software we want we will need to search on dockerhub. In our case Ollama has an official image.
To use this we will need to create a container new .def file. In the Definitions directory, Create a new file. Ollama.def that reads as follows:
Bootstrap: docker
From: ollama/ollama:0.15.2
# Commands to run when building the container
%post -c /bin/bash
    apt update && \
    apt -y install python3.12 \
    python3.12-venv python3-pip && \
    python3 -m venv /envs/Ollama_env && \
    source /envs/Ollama_env/bin/activate && \
    pip install ollama

%startscript
# Command to run when starting as a background process
    ollama serve

%environment
    export OLLAMA_MODELS="{{ toolkit_home }}/Models/ollama"
    export PATH="/envs/Ollama_env/bin:$PATH"
The first two lines of this file tell Apptainer to start with the definition from dockerhub for version 0.15.2 of Ollama, the latest version available at the time of writing. Note: This string we are using comes from the docker pull command. This can generally be found at the bottom right of the docker webpage for the official Ollama image (see the red box on the screenshot, you may need to scroll down to find it).
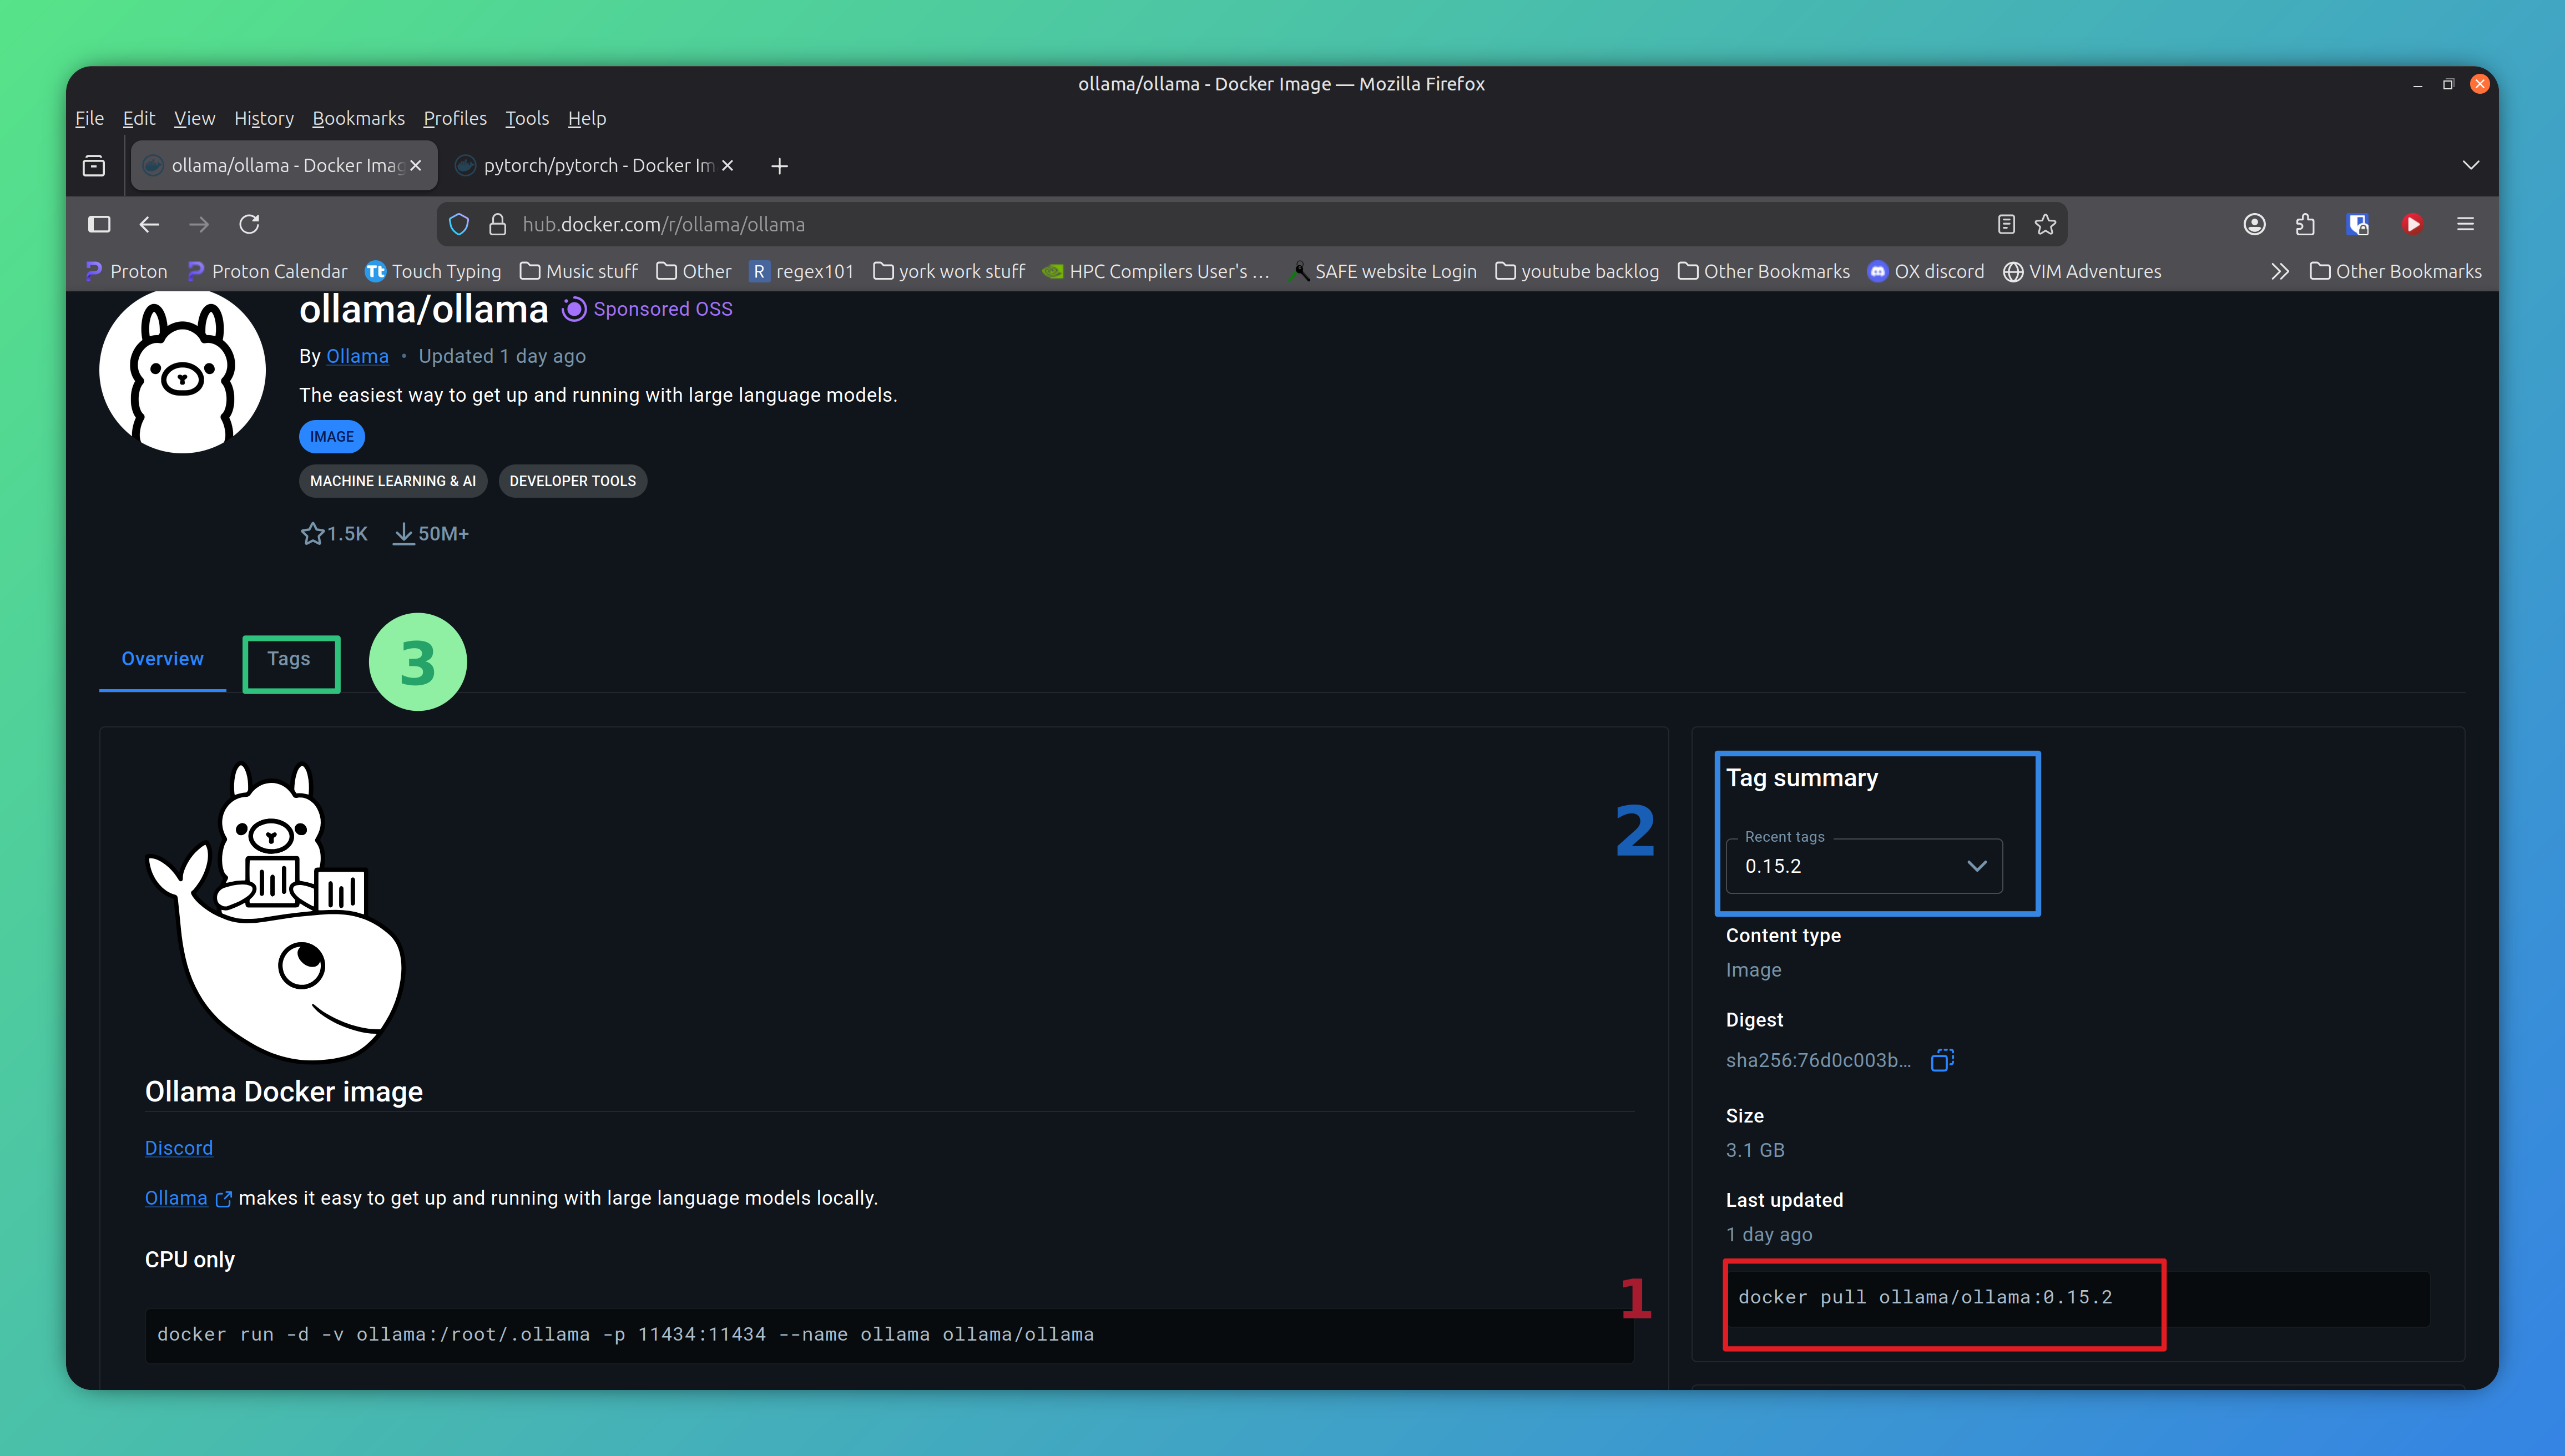
Screenshot of Ollama page on dockerhub, The corresponding docker pull command is located at the bottom right (shown by the red box with number 1). depending on your device you may need to scroll down to find it. The blue box (numbered 2) shows where we have changed the version tag from the default.
A final note for using dockerhub on Bede
There is one final quirk to consider when using containers with dockerhub which is specific to Bede. Bede uses the Nvidia GH100 super chips which are different to a conventional laptop/desktop PC in that they use ARM64 CPUs.
Without going into to much (unnecessary) technical detail they need software to be specifically written (built) for them. Dockerhub does support builds for ARM64. However, its optional and not all images have ARM64 versions.
This is also not helped by the fact it is not obvious at first glance which software does/doesn’t provide them. The easiest way I’ve found to get this information is look under tags (the green box marked 3). On that page there is a column labelled OS/ARCH and you will need to check your specific version for linux/arm64 (not to be confused with the similar looking linux/amd64 which are regular laptop/desktop cpus).
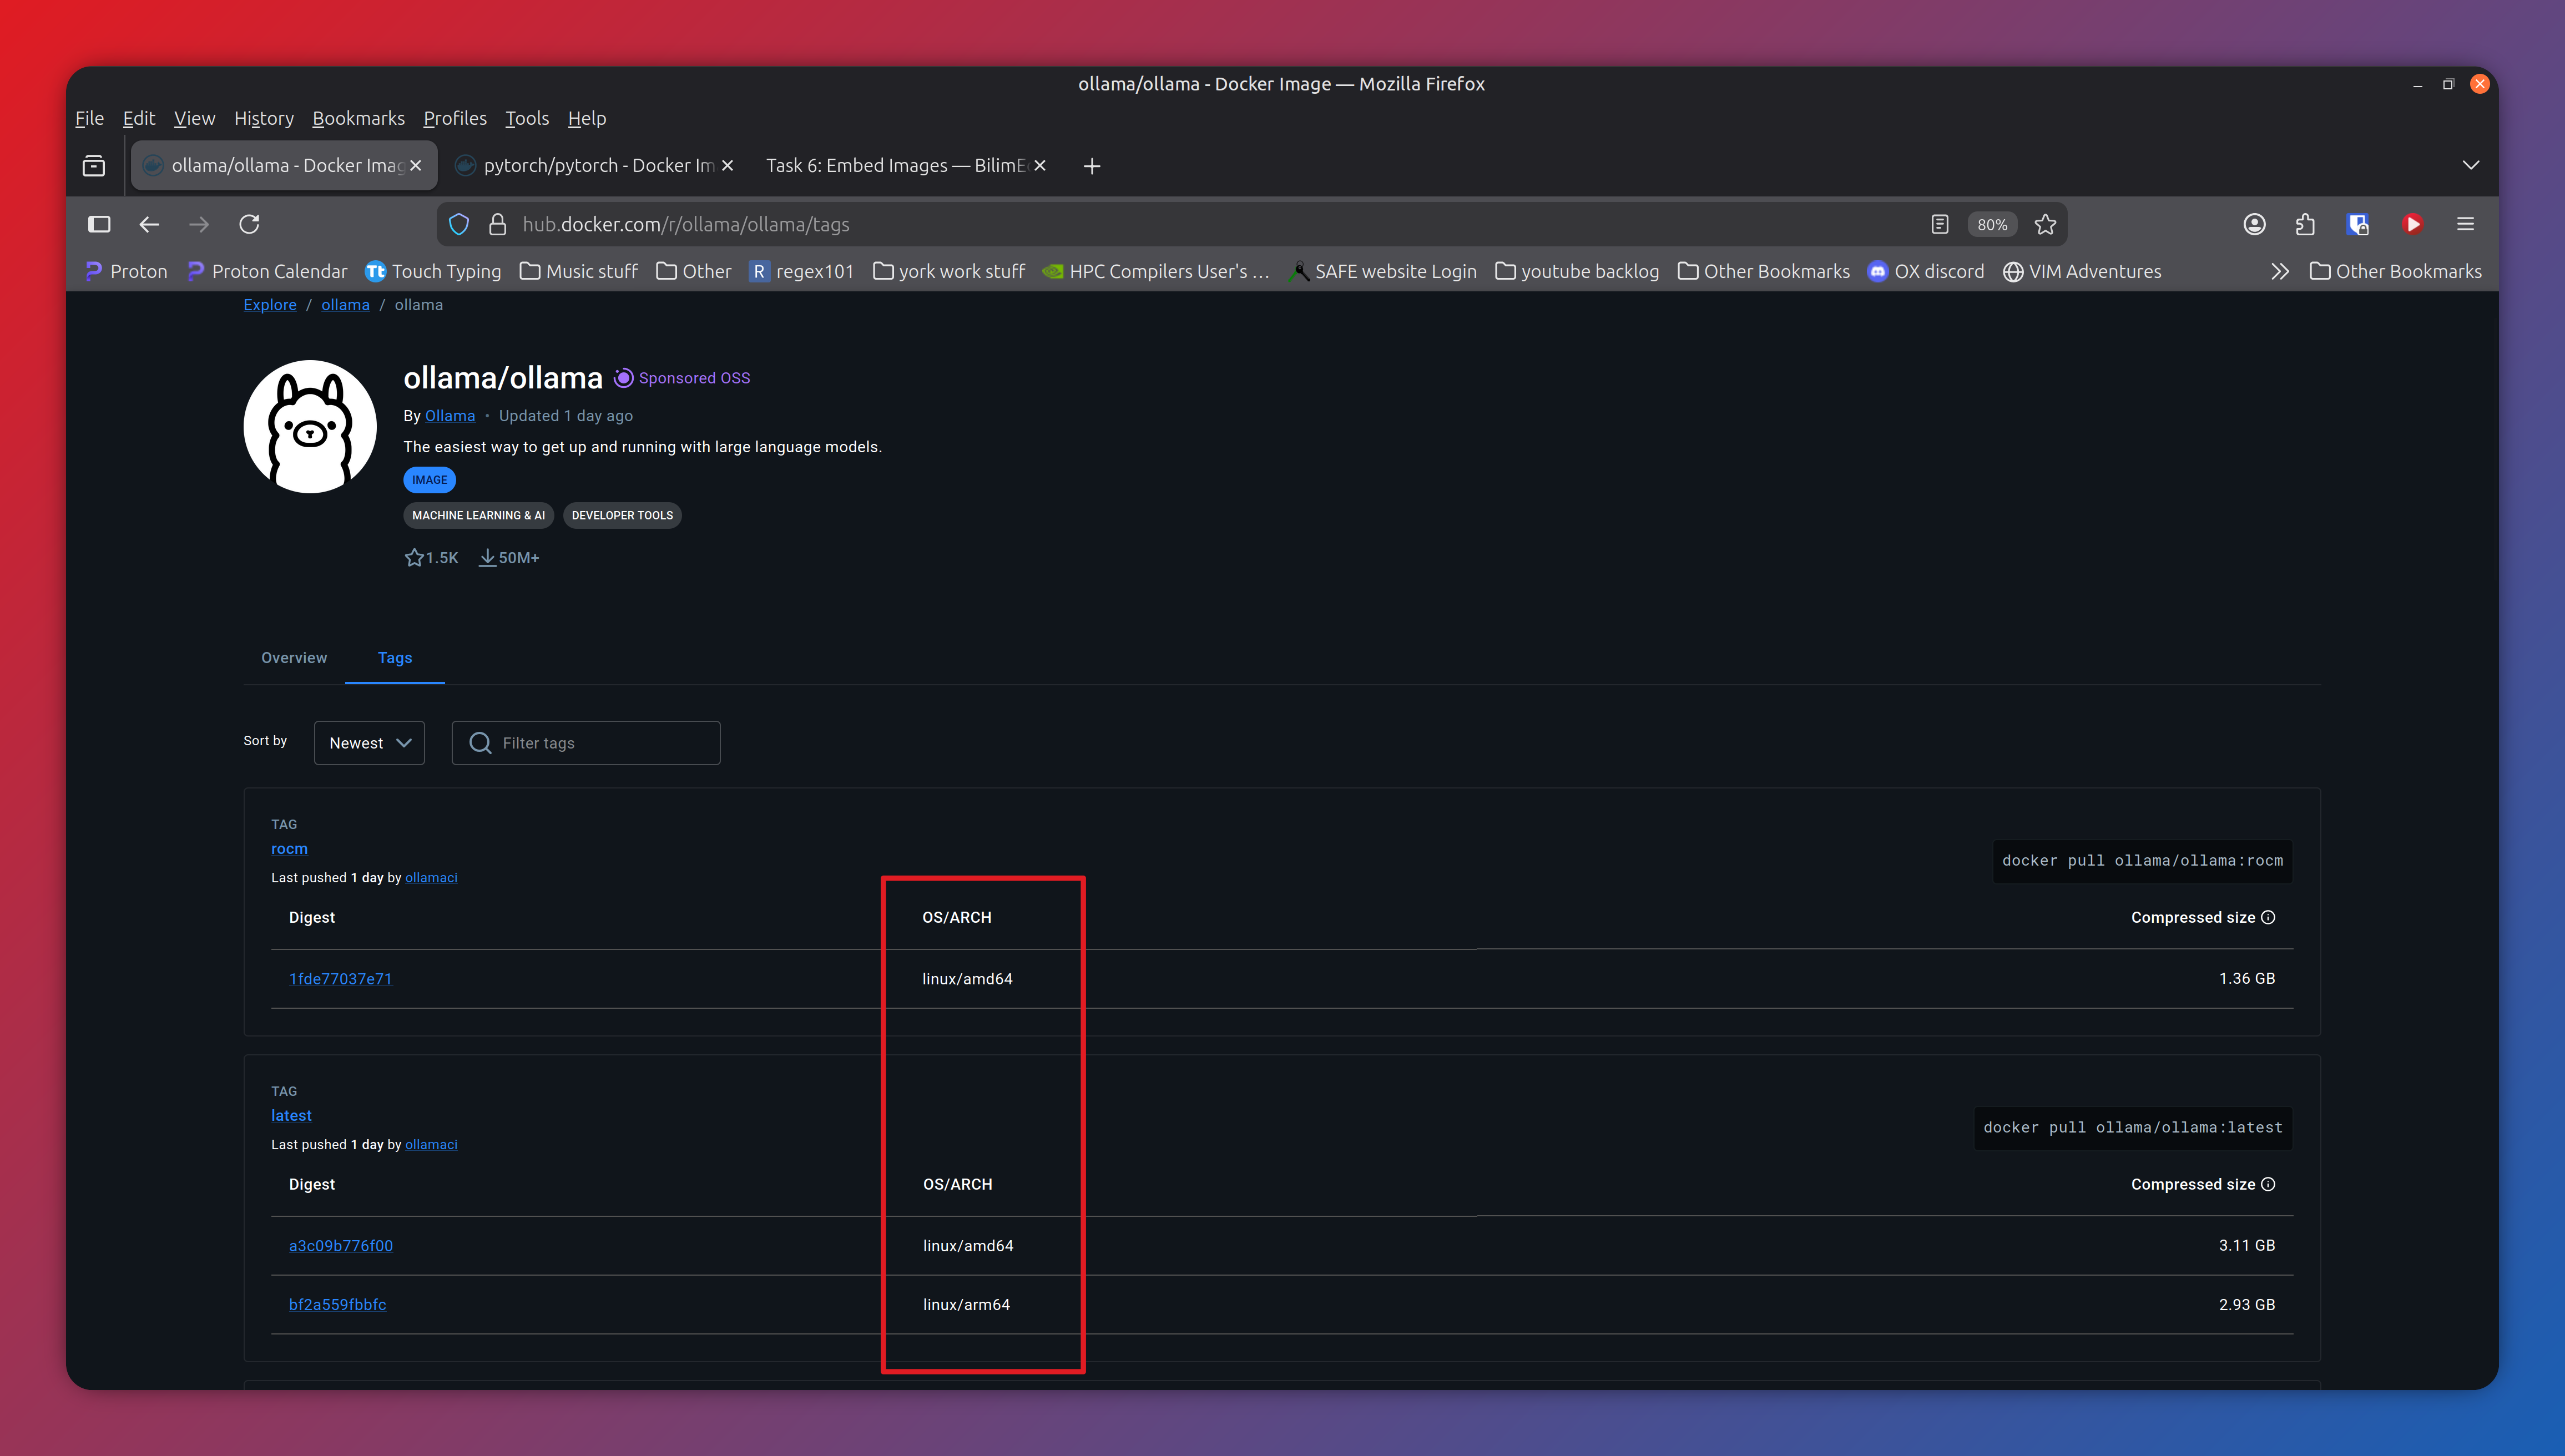
Screenshot of tags page for Ollama on dockerhub, The red box shows the OS/ARCH column which should have the information you need. This is a good example as the version tagged as “rocm” only supports linux/amd64 whereas we need linux/arm64 which is included in the version tagged as “latest”, and indeed version 0.15.2 which is off-screen further down the list.
Back to the definition file
The next section of the .def file, begins at line 4 (the line starting %post).
...

%post -c /bin/bash
    apt update && \
    apt -y install python3.12 \
    python3.12-venv python3-pip && \
    python3 -m venv /envs/Ollama_env && \
    source /envs/Ollama_env/bin/activate && \
    pip install ollama

...
This defines the series of Linux commands that will be run during the build process. In our case, since we are basing our container of an existing one with Ollama already installed. We just need to install python and the ollama pip package to allow us to talk to the model via a python script.
The next section begins at line 12 (the line starting %startscript) and defines the command that runs when the container is started as a background process. In our case this starts the ollama server.
...

%startscript
# Command to run when starting as a background process
    ollama serve

...
The final section %environment defines some variables used by ollama. In our case
line 17 defines the directory in which ollama stores models. Here this is set up
to point to ML_Toolkit directory. The {{ toolkit_home }}
syntax is a special command to tell Apptainer to substitute in the the location
of the ML_Toolkit directory. Note you will need to create the ``Models/ollama``
directories in toolkit home if you do not already have them.
...
%environment
export OLLAMA_MODELS="{{ toolkit_home }}/Models/ollama"
export PATH="/envs/Ollama_env/bin:$PATH"
...
As far as definition files go Apptainer has many more options for more advanced use cases. You can find out more in the Apptainer Documentation. However, This is all we need for our purposes.
With that we have just one final step, adding our new definition to the container config. Change the container_definition line in ollama.yaml to the following: (remember there should be 4 spaces at the start of the line).
container_definition: Definitions/Ollama.def
Running the LLM
So with the setup out of the way in order to run the llm will essentially need to perform 4 steps:
use the build command to build the container.
use the start command to start the ollama server
use the run command to start the model.
use the stop command to cleanup and stop the ollama server once we have finished
Frustratingly however, due to how Bede is setup, the exact steps now vary depending on if you have installed ml-toolkit locally or are using it on Bede.
I’m running locally
In this case the build command would be
ml-toolkit build Ollama_Test_Container
This will download all the files needed from dockerhub then build the container. Once this is complete we can start the Ollama server with:
ml-toolkit start Ollama_Test_Container
you can them check everything is up and running by going to http://localhost:11434/ in a web browser and, all being well, you should get a web page with the text “Ollama is running”.
you should also see the files Ollama_Test_Container.out and Ollama_Test_Container.err
these contain any output and/or errors that has come from the container running in the background.
If this all looks good you can run the following
ml-toolkit run Ollama_Test_Container ollama run smollm2:135m
This will download a tiny 135 million parameter model and start an interactive chat session. Once you have finished your chat you can exit by typing /bye. From here you can explore larger models or other features of Ollama by following the official Ollama documentation .
I’m running on Bede
As previously mentioned getting things working on the GH100s via Bede requires a bit more work.
There are 3 main problems to overcome:
We can’t (or perhaps shouldn’t) run Ollama interactively.
We don’t have GPU access on the login node.
We don’t have internet access on the compute nodes.
Point 1 is easy enough to solve as we can inference the model via the python api. To do this create a new file called ollama_test_chat.py.
from ollama import chat
from ollama import ChatResponse

#model = 'gemma3:latest'
model = 'smollm2:135m'
response: ChatResponse = chat(model=model, messages=[
{
    'role': 'user',
    'content': 'What is the air-speed velocity of an unladen swallow?',
},
])

print(response.message.content)
This will interface with Ollama, ask it a very important question, then finally print the model’s response.
Now to address points two and three. In this case the order of operations is important.
On the login node
First we build the container as normal
ml-toolkit build Ollama_Test_Container
Next we start the Ollama server
ml-toolkit start Ollama_Test_Container
Now we need to run the Ollama pull command to download, but crucially not run our model. In this case we’ll use smollm2, a tiny model which is useful for testing.
ml-toolkit run Ollama_Test_Container ollama pull smollm2:135m
Finally we need to shut the server down
ml-toolkit stop Ollama_Test_Container
You will need to do this process for every model you wish to use. Thus we recommend automating it with a bash script by copying the following into a file called download_models.sh
#!/bin/bash
#  start the Ollama server.
ml-toolkit start Ollama_Test_Container
# download the model
ml-toolkit run Ollama_Test_Container ollama pull $1
# stop the sever
ml-toolkit stop Ollama_Test_Container
Then to convert the file into a runnable script run the following command
chmod +x download_models.sh
Anytime you want a new model you can then run the script as:
./download_models.sh model_name:tag
Where model_name is the model you want and tag is the specific version. For example to download the latest version of gemma3 you would use:
./download_models.sh gemma3:latest
On the compute node
With that out of the way we can now finally get to running on the compute nodes. To do this we will need to create a Slurm script. To do this create the file ollama_test.sh and enter the the following text.
#!/bin/bash
# Example SLURM script for testing Ollama on Bede
# with the ml-toolkit
##########################################
#SBATCH --account CHANGE_ME              # charge job to specified account
#SBATCH --cpus-per-task 1                # number of cpus required per task
#SBATCH --job-name ollama_test           # name of job
#SBATCH --ntasks 1                       # number of processes required
#SBATCH -o ollama_test.out               # File to redirect program output
#SBATCH -e ollama_test.err               # File to redirect any errors
#SBATCH --time 10                        # time limit (in mins)
#SBATCH --partition ghtest               # Choose either gh or ghtest
#SBATCH --gres gpu:1                     # Number of GPUs required for the job
##########################################
# source the python virtual environment
source ml-toolkit/bin/activate
#  start the Ollama server.
ml-toolkit start Ollama_Test_Container
# inference the model via python script
ml-toolkit run Ollama_Test_Container python ollama_test_chat.py
# stop the sever
ml-toolkit stop Ollama_Test_Container
This is an example script that allocates 1 cpu and 1 gpu for 10 minutes. It then starts the Ollama server, runs the python script to inference the model then finally, stops the server.
Note: It will need updating with your account name.
Then you can, finally, submit your job to the compute nodes with
sbatch ollama_test.sh
Once the has job has made it through the queue and been completed by the compute node, all being well, you should see a new file ollama_test.out. This contains the response to your query from Ollama.